The Nuts: (Un)Deinstalling the Oracle Client
In part 1 of this two-part post, I described how to install the Oracle 11g Client and how to fully configure it to work for what I believe is a majority of use-cases on Windows. In this follow-up post, I will discuss how to uninstall (Oracle likes to say deinstall) the client both automatically and manually so you can start over, upgrade to the latest and greatest client, or walkaway from Oracle being on your machine once and for all.
ROSE-Colored Glasses
In a perfect world, removal of the Oracle client is easy and error-free, and my hope is that this will be your experience a majority of the time you uninstall (aka deinstall) the Oracle client. This is actually quite a straight forward process, though it can run astray if you don’t start off on the right foot.
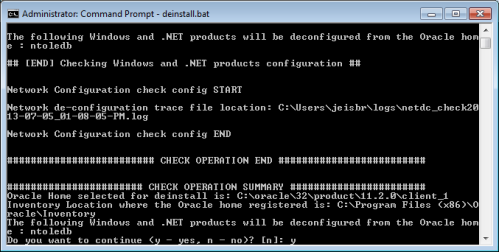
The first and most critical thing is to open up command prompt (cmd.exe) As Administrator. This elevated permission is critical as the uninstallation process will touch the registry, deregister a dll or two, and remove the installation directory. Next, navigate to the (Oracle installation root)/product/11.2.0/client_1/deinstall directory and type the following:
%>deinstall.bat
You may be prompted to confirm removal of various components in this process, at which point I would recommend typing in “y” so everything uninstalls cleanly.
If all goes as planned, you should be greeted with a line stating:
Oracle Universal Installer cleanup was successful.
That’s it; you’re uninstallation (aka deinstallation) went through cleanly! Feel free to do a little dance to celebrate things working as they should; now show some pity on those that must proceed onto the next section.
A Heavy Dose of Reality
Chances are high that if you’re reading this post, your client uninstall (deinstall) didn’t go all that well. As (bad) luck may have it, I also experience this on a relatively frequent basis and have streamlined an approach to cleanup key areas so Oracle Client-related artifacts no longer litter the PC. Basically we’re going to manually emulate what the deinstaller is doing, or rather should have done.
The basic plan for manual removal of the client is as follows:
- Unregister any Oracle OLEDB driver on the system
- Cleanup the registry
- Cleanup System/User Environment Variables
- Cleanup Start Menu entries
- Cleanup the Oracle Client installation directory
- Cleanup the Oracle Inventory list
The order in which we do this is not all that critical so long as we finish everything. I find however that this order of operations works best in case you are unable to clean-up everything in one session, as the more important areas are listed first.
dll-leet – Unregister any Oracle OLEDB driver on the system
I know, it’s a horrible heading, but it is accurate in that we want to remove the dll reference from the PC. To do this, we need to first open up command prompt As Administrator. Next, navigate to the (Oracle installation root)/product/11.2.0/client_1/BIN directory and type the following:
%>regsvr32.exe -u OraOLEDB11.dll
If you’re on a 64-bit OS and are deregistering the 32-bit driver, you will need to make sure you’re calling the 32-bit regsvr32 command as follows:
%>C:\Windows\SysWOW64\regsvr32.exe -u OraOLEDB11.dll
Any error messages are fine as this isn’t as critical as the next two steps of the removal process since you shouldn’t be referencing this dll post-uninstall. If reinstalling the client, feel free to skip this step all together as any future client installations that register this driver will overwrite the referenced dll and “fix” this issue as well.
Fun with Regedit – Cleanup the registry
Before proceeding any further, I’m going to plagiarize the standard MS warning in regards to modifying the registry:
 Warning Warning |
| Incorrect use of Registry Editor may cause problems requiring you to reinstall your operating system. Use Registry Editor at your own risk. For more information about how to back up, restore, and modify the registry, see the Microsoft Knowledge Base article “Description of the Microsoft Windows registry” at http://go.microsoft.com/fwlink/?LinkId=62729. |
Now with that out of the way let’s fire-up RegEdit. To do this, either Open the Start Menu -> Run… -> “regedit” or Open the regedt32.exe executable found under C:\Windows\System32\
After opening RegEdit, the registry hive we will be concerned with depends on the bit-level of the client you are trying to remove (e.g. 32-bit or 64-bit). This is critical as 32 and 64 bit keys are stored in different areas of the registry, so it’s crucial to know which bit-level client you’re trying to remove.
| Quick Tip: If you can’t find the Oracle hive in one path listed below, check the other to hopefully determine the bit-level of the client you wish to uninstall. If you happen to have multiple bit-level clients on your PC, the Oracle Home Name for the 32-bit client is always listed with _32bit at the end. |
With the proper bit-level client in mind, delete the Oracle hive and all children entries (NOTE: If you have multiple Oracle clients of the same bit-level, only remove the KEY_OraClient… value of the home you wish to remove). The Oracle hive paths are as follows:
32-bit: HKEY_LOCAL_MACHINE\SOFTWARE\Wow6432Node\Oracle
64-bit: HKEY_LOCAL_MACHINE\SOFTWARE\Oracle
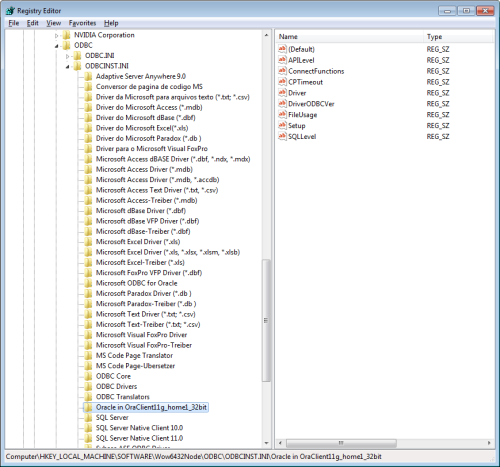
The next hive to remove specifies the location of the Oracle ODBC driver. Delete the appropriate Oracle in OraClient… hive found within one of the following paths:
32-bit: HKEY_LOCAL_MACHINE\Software\Wow6432Node\ODBC\ODBCINST.INI
64-bit: HKEY_LOCAL_MACHINE\Software\ODBC\ODBCINST.INI
DO NOT DELETE the ODBCINST.INI hive, only the proper OraClient… hive found within it. The screenshot below is to ensure you understand what I’m talking about.
Window’s Homage to Unix/Linux – Cleanup System/User Environment Variables
With the registry cleaned up, our next step is to identify and cleanup any User/System Environment variables. As the heading implies, Windows does have Path variables, but these are not commonly used by Windows-exclusive software. However, with Oracle being a multi-platform product, environment variables are standard fare as Unix and Linux variants use them heavily.
Environment variables can be found by opening the Start Menu -> Right-Clicking on Computer -> Properties -> Advanced System Settings (left pane) -> Environment Variables… button.
We are interested in modifying the Path System Environment Variable. This variable tends to be quite large, so I would recommend you copy/paste the contents of the Variable value into Notepad or some other text editor. From there, remove the reference to the path of the Oracle Client you are uninstalling, paste the contents back into the Variable Value and press Ok.
I would recommend saving a copy of the Path variable in a text document in case something gets messed up without you knowing it. Once you make the change it’s there to stay so a manual fail-safe is something you should have handy.
Other variables that you may need to touch are LIB and ORACLE_HOME. Not all systems will have these variables specified which is why I don’t provide instructions explicitly for them, but it is the same basic process as is outlined for the Path variable. As with the Path variable, make a manual backup of any Environment variable you modify in case you need to revert back.
Good Housekeeping Part 1 – Cleanup Start Menu entries
The Registry and Environment Variables are the major items you need to address when removing the Oracle client. If you only do those two things, you’ve done the bare minimum to remove the client from your system, so far as applications are concerned. To ensure you don’t find yourself trying to open a broken client, it’s best to remove the shortcuts from the Start Menu as well. This step is probably the easiest in the list of removal operations; just do the following: Open Start Menu -> All Programs -> Right-Click on Oracle – OraClient… -> Delete.
Good Housekeeping Part 2 – Cleanup the Oracle Client installation directory
With the Start Menu references gone, the dll no longer being registered, and no references to the installation path anywhere in the registry or Environment variables, the next step is to remove the Oracle installation directory itself. Do this either using Windows Explorer or the Command prompt -> Del command.
One Last Loose End – Cleanup the Oracle Inventory list
Part of the Oracle installation process creates/updates an Oracle inventory repository of all Oracle products installed on the Windows machine. The final cleanup task for manually removing the client is updating this inventory repository so any future Oracle installations don’t think there’s already an Oracle Home sitting out there in an area you actually cleaned up.
The Oracle inventory is also bit-level dependent. If you are removing a sole 32 or 64 bit client, the quickest and easiest thing to do is delete the Oracle folder found in either the C:\Program Files or C:\Program Files (x86) directory depending on bit-level (x86 is another way of saying 32-bit program locations). If you have multiple installations of the same bit-level client on your machine you will need to edit the inventory.xml file located in the C:\Program Files|Program Files (x86)\Oracle\Inventory\ContentsXML\ folder. The line you need to remove is the line containing HOME NAME and the path of the client you are manually uninstalling. Remove this line, then save the file and you should be done.
<?xml version="1.0" standalone="yes" ?> <!-- Copyright (c) 1999, 2011, Oracle. All rights reserved. --> <!-- Do not modify the contents of this file by hand. --> <INVENTORY> <VERSION_INFO> <SAVED_WITH>11.2.0.3.0</SAVED_WITH> <MINIMUM_VER>2.1.0.6.0</MINIMUM_VER> </VERSION_INFO> <HOME_LIST> <HOME NAME="OraClient11g_home1_32bit" LOC="C:\oracle\32\product\11.2.0\client_1" TYPE="O" IDX="1"/><HOME NAME="OraClient11g_home2_32bit" LOC="C:\oracle\32\temp1\product\11.2.0\client_1" TYPE="O" IDX="2" REMOVED="T"/></HOME_LIST> <COMPOSITEHOME_LIST> </COMPOSITEHOME_LIST> </INVENTORY>
Closing Thoughts
Manual removal of the Oracle Client isn’t necessary, but it will alleviate all manner of headaches compared with the alternative of dealing with a broken Oracle installation. The steps outlined above should help you manually back-out most failed installations, but feel free to post a comment if you’re still running into issues.
– John


Thank you! It worked very well. There are no more remains of old ORACLE installations on my computer.